各种情况下的操作白皮书 CentOS 安装ZSH https://www.cnblogs.com/silentims/p/13740267.html
$ yum install zsh -y $ yum install git -y $ yum install wget -y $ wget https://gitee.com/mirrors/oh-my-zsh/raw/master/tools/install.sh # 编辑 install.sh $ vim install.sh # 把 # REPO=${REPO:-ohmyzsh/ohmyzsh} # REMOTE=${REMOTE:-https://github.com/${REPO} .git} # 替换为 # REPO=${REPO:-mirrors/oh-my-zsh} # REMOTE=${REMOTE:-https://gitee.com/${REPO} .git} $ chomd +x install.sh $ sh install.sh $ cd ~/.oh-my-zsh $ git remote set-url origin https://gitee.com/mirrors/oh-my-zsh.git $ git pull # $ cat /etc/shells $ chsh -s /bin/zsh # $ echo $SHELL $ vim ~/.zshrc # 修改主题 ZSH_THEME="agnoster" $ source ~/.zshrc
安装Git $ sudo yum install -y git $ git config --global user.name "yywwann" $ git config --global user.email "rxyhchen@163.com" $ ssh-keygen -t rsa -C "rxyhchen@163.com" $ git --version
安装Docker # 卸载旧版本 $ sudo yum remove docker \ docker-client \ docker-client-latest \ docker-common \ docker-latest \ docker-latest-logrotate \ docker-logrotate \ docker-engine # 设置仓库 $ sudo yum install -y yum-utils $ sudo yum-config-manager \ --add-repo \ https://download.docker.com/linux/centos/docker-ce.repo # 安装Docker引擎 -y 就是一直yes # $ sudo yum install -y docker-ce docker-ce-cli containerd.io # $ yum list docker-ce --showduplicates | sort -r $ sudo yum install docker-ce-<VERSION_STRING> docker-ce-cli-<VERSION_STRING> containerd.io # 启动Docker $ systemctl start docker # 开机启动 $ systemctl enable docker # 验证安装 $ sudo docker run hello-world $ sudo docker version $ sudo docker ps --all # docker换源 # https://www.cnblogs.com/wpwen/p/12652665.html # 安装 docker-compose $ yum install -y epel-release $ yum install -y docker-compose
安装Python
$ sudo yum -y install python3
# 安装python可能用到的依赖: $ sudo yum install -y openssl-devel bzip2-devel expat-devel gdbm-devel readline-devel sqlite-devel $ sudo yum install -y wget $ wget https://www.python.org/ftp/python/3.6.5/Python-3.6.5.tgz $ tar -zxvf Python-3.6.5.tgz $ cd Python-3.6.5/ $ ./configure --prefix=/usr/local /python3 $ make $ make install $ vim /etc/profile.d/python.sh # python.sh PATH=/usr/local/python3/bin:$PATH # 保存退出后重读配置文件 $ source /etc/profile.d/python.sh
pip换源
$ pip3 install docker-compose -i https://pypi.tuna.tsinghua.edu.cn/simple --trusted-host pypi.tuna.tsinghua.edu.cn
# -i https://pypi.douban.com/simple
# -i http://mirrors.aliyun.com/pypi/simple/
# -i https://pypi.mirrors.ustc.edu.cn/simple/
# -i http://pypi.douban.com/simple/
# -i https://pypi.tuna.tsinghua.edu.cn/simple/
# -i http://pypi.mirrors.ustc.edu.cn/simple/
$ cd ~
$ mkdir .pip
$ cd .pip
$ vim pip.conf
[global]
index-url = https://pypi.tuna.tsinghua.edu.cn/simple
[install]
trusted-host = mirrors.aliyun.com
防火墙 # 开放端口 $ firewall-cmd --zone=public --add-port=5672/tcp --permanent $ firewall-cmd --zone=public --remove-port=5672/tcp --permanent $ firewall-cmd --reload # 查看防火墙所有开放的端口 $ firewall-cmd --zone=public --list-ports # 关闭防火墙 # 如果要开放的端口太多,嫌麻烦,可以关闭防火墙,安全性自行评估 $ systemctl stop firewalld.service # 临时关闭防火墙,重启后会重新自动打开 $ systemctl restart firewalld # 检查防火墙状态 $ firewall-cmd --state $ firewall-cmd --list-all # Disable firewall $ systemctl disable firewalld $ systemctl stop firewalld $ systemctl status firewalld # Enable firewall $ systemctl enable firewalld $ systemctl start firewalld $ systemctl status firewalld # 查看监听的端口 $ netstat -lnpt # 检查端口被哪个进程占用 $ netstat -lnpt |grep 5672 # 查看进程的详细信息 $ ps 6832 # 中止进程 $ kill -9 6832
历史命令查找工具FZF $ git clone --depth 1 https://github.com/junegunn/fzf.git ~/.fzf # $ git clone --depth 1 https://gitee.com/mirrors/fzf.git ~/.fzf # 安装 $ ~/.fzf/install $ source ~/.fzf.zsh $ source ~/.zshrc # 如果使用 bash 就把 zsh 换成 bash # $ echo $SHELL # $ source ~/.bashrc # 卸载 # $ ~/.fzf/uninstall
查看当前占用CPU/内存最多的10个进程 可以用以下命令查看使用内存最多的10个进程
ps -aux|head -1;ps -aux|sort -k4nr|head -10
说明:
a指代all——所有的进程
u指代userid——执行该进程的用户id
x指代显示所有程序,不以终端机来区分
ps -aux的输出格式如下:
USER        PID %CPU %MEM    VSZ   RSS TTY      STAT START   TIME COMMAND
root      39002  0.9  5.5 12164084 1805100 ?    Ssl  11月11  22:37 java -jar -*.jar
sort -k4nr中:
k代表从第几个位置开始,后面的数字4即是其开始位置,结束位置如果没有,则默认到最后
n指代numberic sort,根据其数值排序
r指代reverse,这里是指反向比较结果,输出时默认从小到大,反向后从大到小
本例中,%MEM在第4个位置,根据%MEM的数值进行由大到小的排序
Django
$ pip3 install django
$ django-admin startproject <django_demo>
$ python manage.py startapp <app_name>
$ python manage.py runserve <ip:port>
# 导出
$ python manage.py dumpdata [appname 没有的话就是全部数据] > appname_data.json
# 导入
$ python manage.py loaddata appname_data.json
$ docker ps $ docker exec -it container_id python manage.py createsuperuser
定时任务(失败,没有成功)
django-crontab只能在linux系统下使用, win10可以使用docker容器
安装: pip install django-crontab
from django.core.mail import send_mailfrom django.conf import settingsfrom django.template.loader import render_to_stringfrom task.models import Taskfrom django.contrib.auth.models import Userdef send_task_email (): user_list = User.objects.filter () for user in user_list: tasks = Task.objects.filter (status=False , user=user) if tasks: html_message = render_to_string('task/task.html' , {'tasks' : tasks, 'user' : user}) subject = '任务提醒' message = '' sender = settings.EMAIL_FROM receiver = [user.email] send_mail(subject, message, sender, receiver, html_message=html_message)
CRONJOBS = [ ('00 10 * * *' , 'task.scheduled_task.send_task_email' , '>>task.log' ), ]
任务队列是一个列表,里面的每个元祖元素都是一个任务对象,00 10 * * *是每天10点执行
# crontab范例
# 每五分钟执行    */5 * * * *
# 每小时执行      0 * * * *
# 每天执行        0 0 * * *
# 每周执行        0 0 * * 0
# 每月执行        0 0 1 * *
第二个参数为任务函数的路径
$ docker ps $ docker exec -it container_id python manage.py crontab add # 添加任务 `python manage.py crontab add` # 查看任务 `python manage.py crontab show` # 删除任务 `python manage.py crontab remove`
Docker 常用命令 # 启动 docker $ sudo systemctl start docker # 重启 docker $ sudo systemctl daemon-reload $ sudo systemctl restart docker
# 1、查看当前docker容器中已有的image $ docker image ls # 2、查看所有的容器 $ docker ps -a # 3、批量停止在运行中的容器 $ docker ps -a | grep 'Up' | awk '{print $1}' | xargs docker container stop # 4、批量删除Exited状态的容器 $ docker ps -a | grep 'Exited' | awk '{print $1}' | xargs docker container rm # 5、批量删除name为none的image $ docker image ls | grep none | awk '{print $3}' | xargs docker image rm
docker-compose # 查看帮助 $ docker-compose -h # -f 指定使用的 Compose 模板文件,默认为 docker-compose.yml,可以多次指定。 $ docker-compose -f docker-compose.yml up -d # 启动所有容器,-d 将会在后台启动并运行所有的容器 $ docker-compose up -d # 停用移除所有容器以及网络相关 $ docker-compose down # 查看服务容器的输出 $ docker-compose logs # 列出项目中目前的所有容器 $ docker-compose ps # 构建(重新构建)项目中的服务容器。服务容器一旦构建后,将会带上一个标记名,例如对于 web 项目中的一个 db 容器,可能是 web_db。可以随时在项目目录下运行 docker-compose build 来重新构建服务 $ docker-compose build # 拉取服务依赖的镜像 $ docker-compose pull # 重启项目中的服务 $ docker-compose restart # 删除所有(停止状态的)服务容器。推荐先执行 docker-compose stop 命令来停止容器。 $ docker-compose rm # 在指定服务上执行一个命令。 $ docker-compose run ubuntu ping docker.com # 设置指定服务运行的容器个数。通过 service=num 的参数来设置数量 $ docker-compose scale web=3 db=2 # 启动已经存在的服务容器。 $ docker-compose start # 停止已经处于运行状态的容器,但不删除它。通过 docker-compose start 可以再次启动这些容器。 $ docker-compose stop # 参考 https://lilogs.com/archives/1440.html
查看volumes挂载的位置 $ docker inspect <容器 id> # 然后找到 mounts 中的 source
Dockerfile https://lilogs.com/archives/970.html
发布镜像
错误解决
$ sudo vim /etc/resolv.conf
# add
nameserver 8.8.8.8
nameserver 8.8.4.4

$ sudo systemctl daemon-reload
$ sudo systemctl restart docker
解决每次运行都需要 sudo $ sudo groupadd docker $ sudo gpasswd -a $USER docker $ newgrp docker
换源 $ vim /etc/docker/daemon.json { "registry-mirrors":[ "http://docker.mirrors.ustc.edu.cn", "http://hub-mirror.c.163.com", "http://registry.docker-cn.com" ] , "insecure-registries":[ "docker.mirrors.ustc.edu.cn", "registry.docker-cn.com" ] } # 重启 docker $ service docker restart
io/timeout $ ping xxx.xxx.xxx # get ip $ vim /etc/hosts ip xxx.xxx.xxx
清理空间 $ docker system prune # 查看docker所占的硬盘大小 $ docker system df
bind 和 volume 的区别 Etcd
etcd1:
    image: quay.io/coreos/etcd
    container_name: etcd
    environment:
      ETCDCTL_API: 3
    volumes:
      - ./data/etcd/etcd-data:/etcd-data
    command: etcd -name etcd1 -advertise-client-urls http://0.0.0.0:2379 -listen-client-urls http://0.0.0.0:2379 -listen-peer-urls http://0.0.0.0:2380 -initial-cluster-token tkn -initial-cluster-state new
    ports:
      - "2379:2379"
      - "2380:2380"
$ docker exec -it etcd /bin/sh $ export ETCDCTL_API=3 $ etcd --version $ etcdctl version $ etcdctl put foo bar $ etcdctl getfoo $ etcdctl get --from-key "" --keys-only
fail2ban CentOS安装
配置文件
$ cp /etc/fail2ban/jail.conf /etc/fail2ban/jail.local
$ /etc/fail2ban/jail.conf
[DEFAULT]
#  以空格分隔的列表,可以是 IP 地址、CIDR 前缀或者 DNS 主机名
#  用于指定哪些地址可以忽略 fail2ban 防御
ignoreip = 127.0.0.1/8 ::1 42.192.50.232 183.138.11.158

#  客户端主机被禁止的时长(秒)
bantime = 86400

#  客户端主机被禁止前允许失败的次数
maxretry = 5

#  查找失败次数的时长(秒)
findtime = 600

mta = sendmail

#  根据上述配置,fail2ban会自动禁止在最近10分钟内有超过3次访问尝试失败的任意IP地址。一旦被禁,这个IP地址将会在24小时内一直被禁止访问 SSH 服务。这个事件也会通过sendemail发送邮件通知。
[ssh-iptables]
enabled = true
filter = sshd
action = iptables[name=SSH, port=ssh, protocol=tcp]
sendmail-whois[name=SSH, dest=your@email.com, sender=fail2ban@email.com]
#  Debian 系的发行版
logpath = /var/log/auth.log
#  Red Hat 系的发行版
logpath = /var/log/secure
#  ssh 服务的最大尝试次数
maxretry = 3

[nginxno404]
# 处理 nginx 下的恶意 404 结果扫描
enabled = true
port = http,https
filter = nginx-not-found
action = iptables[name=nginxno404, port=http, protocol=tcp]
# Fail2Ban 要监控的站点日志文件,大家可以根据自己站点来灵活调整。
logpath  = /root/etc/supervisor/var/log/noBB-drf-nginx-stdout.log   /root/etc/supervisor/var/log/noBB_web_back-stdout.log
bantime = 3600 # 默认是屏蔽 IP 地址 10 分钟
# 下面这两个是说 60 秒内 5 次 404 失败请求就开始屏蔽这个 IP 地址
findtime = 60
maxretry = 5
vim /etc/fail2ban/filter.d/nginx-not-found.conf
[Definition]
failregex = <HOST> -.* \[.*\] "(GET|POST|HEAD).*HTTP.* (404|444|403|400)
ignoreregex =
一旦配置文件准备就绪,按照以下方式重启fail2ban服务。
# 启动 $ service fail2ban restart # 检查是否启动 $ sudo fail2ban-client ping # 设置开机自启 $ systemctl enable fail2ban # 测试规则 $ fail2ban-regex /root/trash/test.log /etc/fail2ban/filter.d/nginx-not-found.conf --print-all-missed # 查看日志 $ tail -f /var/log /fail2ban.log # 查看 iptables 防火墙的拦截 $ iptables --list -n # 检验fail2ban状态 $ fail2ban-client status # 解除ip限制 $ fail2ban-client set nginxno404 unbanip <172.104.78.195> # 查看[nginxno404]这个监狱的运行状况来查看已经屏蔽的 IP 地址有哪些 $ fail2ban-client status nginxno404
Git 常用命令 # 安装git后 $ git config --global user.name "Your Name" $ git config --global user.email "email@example.com" $ ssh-keygen -t rsa -C "youremail@example.com" 创建ssh key,用于和github通信 # (秘钥存储于C:\Users\27634\.ssh,把公钥id_rsa.pub存储于github) # 创建版本库 $ pwd $ git init # 操作版本库 $ git add <文件名> $ git commit -m "说明" $ git status $ git diff <文件名> # 版本回退(从一个commit恢复) $ git log $ git reset --hard HEAD^ $ git reset --hard 1094a $ git reflog $ git checkout -- file $ git reset HEAD <file> # 删除文件 $ git rm file $ git checkout -- file # 远程仓库 $ git remote add origin git@server-name:path/repo-name.git $ git push -u origin master $ git push origin master $ git pull $ git branch --set-upstream-to=origin/远程分支 本地分支 关联分支 $ git clone git@server-name:path/repo-name.git # 分支 $ git branch -a $ git branch -vv $ git branch dev $ git checkout dev $ git merge dev $ git merge --no-ff -m "msg" dev $ git branch -d dev $ git checkout -b dev # 合并分支,无法merge $ git stash save 名字 $ git pull origin dev $ git stash list $ git stash pop stash@{0} # 还有冲突时,手动修改文件,然后add/commit $ git log --graph # bug分支issue $ git stash $ git stash list $ git stash pop # 开发分支feature $ git branch -D <name> # rebase $ git rebase # 标签 $ git tag 标签名 $ git tag $ git tag 标签名 f52c633 $ git tag -a 标签名 -m "msg" commit的id $ git show 标签名 $ git tag -d 标签名 $ git push origin 标签名 $ git push origin --tags $ git push origin :refs/tags/<tagname>
免密访问私有仓库 # global针对所有仓库,建议不要使用, $ git config --global credential.helper store $ git pull # 输完账号密码以后就不用再输入了
git commit 标准
<type>(<scope>): <subject>
<BLANK LINE>
<body>
<BLANK LINE>
<footer>
<type>
<scope>
对 package.json 文件新增依赖库,chore(package.json): 新增依赖库
或对代码进行重构,refacto(weChat.vue): 重构微信进件
<subject>
修改已提交的 commit 信息 合并多次 commit $ git rebase -i HEAD~<n:int 合并 n 条> # 把要被合并的 commit 的 pick 修改为 squash
.gitignore $ git rm -r --cached . $ git add . $ git commit -m 'update .gitignore'
例子
# 此为注释 – 将被 Git 忽略

*.a       # 忽略所有 .a 结尾的文件
!lib.a    # 但 lib.a 除外
/TODO     # 仅仅忽略项目根目录下的 TODO 文件,不包括 subdir/TODO
build/    # 忽略 build/ 目录下的所有文件
doc/*.txt # 会忽略 doc/notes.txt 但不包括 doc/server/arch.txt

/gradle/wrapper/gradle-wrapper.properties
##----------Android----------
# build
*.apk
*.ap_
*.dex
*.class
bin/
gen/
build/

# gradle
.gradle/
gradle-app.setting
!gradle-wrapper.jar
build/

local.properties

##----------idea----------
*.iml
.idea/
*.ipr
*.iws

# Android Studio Navigation editor temp files
.navigation/

##----------Other----------
# osx
*~
.DS_Store
gradle.properties
————————————————
Go 如何在新的win10系统配置Go环境
进入官网下载安装包, https://golang.google.cn/dl/
运行安装包
go version 检查是否成功
GOPATH(工作目录):编写代码的目录 C:\Projects\GoProjects
GOROOT:指定go的安装路径。注意:为bin文件夹的上级目录 C:\Go
PATH:/bin目录 C:\Go\bin
Mac 升级 Go 版本 # 卸载旧的 go $ rm -rf /usr/local /go
下载新版本https://golang.google.cn/dl/
go proxy # 启用 Go Modules 功能 $ go env -w GO111MODULE=on # 配置 GOPROXY 环境变量,以下三选一 # 1. 七牛 CDN $ go env -w GOPROXY=https://goproxy.cn,direct # 2. 阿里云 $ go env -w GOPROXY=https://mirrors.aliyun.com/goproxy/,direct # 3. 官方 $ go env -w GOPROXY=https://goproxy.io,direct
go 私有库 $ go env -w GOPRIVATE=gitlab.33.com # ~/.gitconfig [url "git@github.com:"] insteadOf = https://github.com/ [url "git@gitlab.33.cn:"] insteadOf = https://gitlab.33.cn/ # https://segmentfault.com/a/1190000021127791
Goland 快捷键
自动重置试用时间 https://gitee.com/pengzhile/ide-eval-resetter
Hexo
# https://nodejs.org/en/ # to fix EACCES errors $ sudo chown -R `whoami` ~/.npm $ sudo chown -R `whoami` /usr/local /lib/node_modules # npm 换成 阿里源 $ npm config set registry https://registry.npm.taobao.org # 验证命令, 返回https://registry.npm.taobao.org,说明镜像配置成功。 $ npm config get registry # 安装cnpm $ npm install -g cnpm --registry=https://registry.npm.taobao.org # 以后npm安装的东西都用c开头,Understand?
$ cnpm install -g hexo-cli
$ cnpm install -g hexo
$ cnpm install -g hexo-deployer-git
$ cnpm install hexo-renderer-pug hexo-renderer-stylus --save
参考 https://butterfly.js.org/
在`source`文件夹中创建`CNAME`文件, 内容为你的域名
Iterm2 新tab使用前一个tab 的路径
有用的快捷键
⌘ + d 横着分屏 / ⌘ + shift + d 竖着分屏
切换屏幕:command + option + 方向键 command + [ 或 command + ]
新建标签:command + t
切换标签:command + 数字 command + 左右方向键
清屏: command+r, ctrl+l
主题和美化
# https://sspai.com/post/63241
插件建议直接从 github 下载 zip 文件比较快
Kafka docker-compose.yml
version: '3' zoo: image: wurstmeister/zookeeper restart: unless-stopped hostname: zoo ports: - "2181:2181" container_name: zookeeper kafka: image: wurstmeister/kafka ports: - "9092:9092" environment: - KAFKA_ADVERTISED_HOST_NAME=localhost - KAFKA_ZOOKEEPER_CONNECT=zoo:2181 - KAFKA_BROKER_ID=1 - KAFKA_OFFSETS_TOPIC_REPLICATION_FACTOR=1 - KAFKA_CREATE_TOPICS=stream-in:1:1,stream-out:1:1 depends_on: - zoo container_name: kafka
知识点 一个 topic 包含多个分区, 每个消息根据键发送到指定分区 消费者群组(内含多个消费者): 群组保证每个分区只能被一个消费者使用
$ docker exec -it kafka /bin/bash

$ kafka-topics.sh --create --zookeeper zookeeper:2181 --replication-factor 1 --partitions 1 --topic test

# 查询所有 topic
$ kafka-topics.sh --list --zookeeper zookeeper:2181

# 查看 topic 信息
$ kafka-topics.sh --describe --zookeeper zookeeper:2181 --topic test

# 启动一个生产者
$ kafka-console-producer.sh --broker-list localhost:9092 --topic test

# 启动一个消费者
$ kafka-console-consumer.sh --bootstrap-server localhost:9092 --topic test --from-beginning

$ kafka-topics.sh --create --zookeeper zookeeper:2181 --replication-factor 2 --partitions 2 --topic my-replicated-topic
$ kafka-topics.sh --describe --zookeeper zookeeper:2181 --topic my-replicated-topic
# Topic: my-replicated-topic	PartitionCount: 2	ReplicationFactor: 2	Configs:
#	  Topic: my-replicated-topic	Partition: 0	Leader: 2	Replicas: 2,1Isr: 2
#	  Topic: my-replicated-topic	Partition: 1	Leader: 1	Replicas: 1,2Isr: 1,2
$ kafka-topics.sh --alter --zookeeper zookeeper:2181 --partitions 16 --topic goim-zb_otc-topic
$ kafka-topics.sh --delete --zookeeper zookeeper:2181 --topic goim-zb_otc-topic

# new api
# 查看所有 topic
$ kafka-topics.sh --bootstrap-server localhost:9092 --list
# 新建 topic
$ kafka-topics.sh --bootstrap-server localhost:9092 --topic test16 --create --replication-factor 1 --partitions 16
# 查看 topic 详细信息
$ kafka-topics.sh --bootstrap-server localhost:9092 --topic pubv2  --describe
$ kafka-console-producer.sh --bootstrap-server localhost:9092 --topic quickstart-events
$ kafka-console-consumer.sh --bootstrap-server localhost:9092 --topic quickstart-events --from-beginning

$ kafka-topics.sh --bootstrap-server localhost:9092 --topic pubv2 --alter --partitions 16
# 查看所有消费者组
$ kafka-consumer-groups.sh --bootstrap-server localhost:9092 --list
# 查看某个消费者组的具体消费情况
$ kafka-consumer-groups.sh --bootstrap-server localhost:9092 --group <group_name> --describe
Kubernetes $ GO111MODULE="on" go get sigs.k8s.io/kind@v0.10.0 $ kind create cluster $ kind version $ kind create cluster --name mohuishou $ kind get clusters $ kind delete cluster $ kind delete clusters mohuishou # 创建一个多节点的集群 $ kind create cluster --name mohuishou-ha --config kind-ha.yml
# 查询我们当前默认操作的集群是哪一个 $ kubectl config current-context # 设置默认操作集群 $ kubectl config use-context <context-name> # 查看集群信息 $ kubectl cluster-info [--context <context-name>] # 查看集群节点列表 $ kubectl get no # 完成部署 $ kubectl apply -f nginx.yml # 删除部署 $ kubectl delete -f nginx.yml # 查看当前 deployment 的状态 $ kubectl get deployment # 查看 pod 的状态 $ kubectl get pods # 端口转发功能来讲流量从本地转发给 k8s 集群 $ kubectl port-forward <nginx-deployment-66b6c48dd5-2s5cb> 30080:80 $ kubectl get pods -n kube-system $ kubectl describe nodes $ kubectl apply -f "https://cloud.weave.works/k8s/net?k8s-version=$(kubectl version | base64 | tr -d '\n') "
Linux Mac 开启任意来源
$ sudo spctl –master-disable
启动软件, 提示已损坏
$ sudo xattr -d com.apple.quarantine /Applications/<软件名字>.app
重装系统后首先安装的 app
$ /bin/bash -c "$(curl -fsSL https://raw.githubusercontent.com/Homebrew/install/HEAD/install.sh) " # https://zhuanlan.zhihu.com/p/90508170 # https://brew.sh/index_zh-cn
# https://segmentfault.com/a/1190000014992947
# https://docs.docker.com/docker-for-mac/install/

换源
# https://juejin.cn/post/6844904202758520845
# 安装 python3
# https://www.runoob.com/note/52675

# 安装 pip 和换源
$ brew install protobuf $ go install google.golang.org/protobuf/cmd/protoc-gen-go@v1.26 $ go install google.golang.org/grpc/cmd/protoc-gen-go-grpc@v1.1 $ export PATH="$PATH :$(go env GOPATH) /bin"
- Transmit
- BetterTouchTool
- Golang
- Alfred
- Iterm2
- 百度网盘
- 滴答清单
- 石墨文档
- 天翼云盘
- 微信
- 迅雷
- Another Desktop Manager
- Commander One
- Dozer
- iStat Menus
- Keka
- Dr. Unarchiver-
- Microsoft Edge
- Microsoft Office
- Movist
- Navicat Premium
- OpenVPN Connect
- Parallels Desktop
- PDF Expert
- Postman
- QQ
- Typora
- V2rayU
- Visual Studio Code
- Snipaste
- Docker
修改文本默认打开工具 $ brew install duti # 默认由 atom 打开 # $ duti -s com.github.atom public.plain-text all $ duti -s com.microsoft.VSCode public.plain-text all $ duti -s com.microsoft.VSCode unix-executable all
MySQL win10 安装MySQL8.0 参考博客 下载地址
Navicat 连接mysql报1251错误
打开MySQL Command Line Client
输入密码登录
ALTER USER ‘root‘@’localhost’ IDENTIFIED WITH mysql_native_password BY ‘你的密码’;
FLUSH PRIVILEGES;
OK, 可以连接了
noBB noBB_drf 更新代码后如何部署到云端 本地:
$ git add .
$ git commit -m 'xxx'
$ git push
云端:
# 通过 ssh 连接云服务器
$ cd apps/noBB_drf
$ git pull
$ cd ~
$ supervisorctl restart noBB-drf-mysql
$ supervisorctl restart noBB-drf
$ supervisorctl restart noBB-drf-nginx
云服务器重启后如何重新部署 noBB_drf $ systemctl start docker $ supervisord -c /root/etc/supervisord.conf $ supervisorctl restart noBB-drf-mysql $ supervisorctl restart noBB-drf $ supervisorctl restart noBB-drf-nginx
Python系列 win10新电脑装Pyhton3.6.4
x 在linux环境下运行定时脚本 import timewhile (True ): with open ('time.log' , 'a+' ) as logfile: logfile.write('Hello, World!\n' ) time.sleep(1 ) $ nohup python time.py &
功能:实现了每秒将 “Hello, World!” 字符串,写入当前目录下的 time.log 文件中。
原理:利用 python 的无限循环 while(True) ,并使用 time.sleep() 方法设置相应的秒数时停,最后通过 nohup 和 & 命令将脚本挂在后台不挂断的运行。
nohup command &:在后台运行 command,原程序的标准输出和错误重定向到当前目录下的 nohup.out 文件中。如果当前目录的 nohup.out 文件不可写,输出重定向到 $HOME/nohup.out 文件中。
查看:通过 tail -f time.log 在当前终端追踪显示 time.log 文件,可用 Ctrl+c 中断显示。
中断:
或者通过 ps aux | grep python 命令查看 python 进程,找到挂起的脚本的 PID ,再使用 kill -9 PID 中断挂起的脚本。
ps aux | grep python
$ kill -9 [pid]
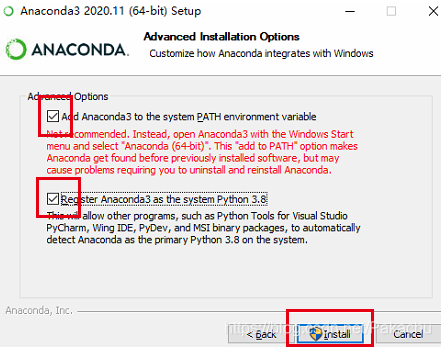
Anaconda3
下载地址 https://mirrors.tuna.tsinghua.edu.cn/anaconda/archive/
$ conda config --add channels https://mirrors.tuna.tsinghua.edu.cn/anaconda/cloud/conda-forge/
$ conda config --add channels https://mirrors.tuna.tsinghua.edu.cn/anaconda/pkgs/free/
$ conda config --set show_channel_urls yes

# 删除channels
$ conda config --remove channels xxx
# 备用
# mirrors.tuna.tsinghua.edu.cn/anaconda/cloud/msys2/
# mirrors.tuna.tsinghua.edu.cn/anaconda/cloud/pytorch
C:\Users\USERNAME\pip\pip.ini
[global]
index-url=https://pypi.tuna.tsinghua.edu.cn/simple
[install]
trusted-host=pypi.tuna.tsinghua.edu.cn
disable-pip-version-check = true
timeout = 6000
$ conda list
$ conda env list
$ source activite xxx
Redis win10安装redis 下载Redis安装包,网址https://github.com/MicrosoftArchive/redis/releases/tag/win-3.2.100,下载zip文件 cmd至文件夹
# 启动
$ redis-server redis.windows.conf
# 设置服务
$ redis-server.exe --service-install redis.windows.conf --loglevel verbose
# 启动服务
$ redis-server --service-start
# 卸载服务
$ redis-server  --service-uninstall
# 停止服务
$ redis-server  --service-stop
默认端口 6379
测试缓存是否成功 本步骤非必须,只是为了测试看可否正常使用redis。
逐条输入如下命令测试:
from django.core.cache import cache cache.set ('v' , '555' , 60 *60 ) cache.has_key('v' ) cache.get('v' )
基于 Docker 部署 Redis 集群 https://lilogs.com/archives/1089.html
查看 Redis 容器版本 $ docker exec -it redis redis-server -v
-- Redis daemonize介绍
一、Redis daemonize介绍
1、daemonize介绍

A、redis.conf配置文件中daemonize守护线程,默认是NO。
B、daemonize是用来指定redis是否要用守护线程的方式启动。
2、daemonize 设置yes或者no区别

daemonize:yes:redis采用的是单进程多线程的模式。当redis.conf中选项daemonize设置成yes时,代表开启守护进程模式。在该模式下,redis会在后台运行,并将进程pid号写入至redis.conf选项pidfile设置的文件中,此时redis将一直运行,除非手动kill该进程。
daemonize:no: 当daemonize选项设置成no时,当前界面将进入redis的命令行界面,exit强制退出或者关闭连接工具(putty,xshell等)都会导致redis进程退出。

-- 配置文件
# 访问密码
requirepass

# 持久化数据
appendonly yes

daemonize no
Shell
# 三个命令同时执行
$ command1 & command2 & command3
# 不管前面命令执行成功没有,后面的命令继续执行
$ command1; command2; command3
# 只有前面命令执行成功,后面命令才继续执行
$ command1 && command2
Curl -d 参数用于发送 POST 请求的数据体。
$ curl -d'login=emma&password=123' -X POST https://google.com/login $ curl -d 'login=emma' -d 'password=123' -X POST https://google.com/login
使用-d参数以后,HTTP 请求会自动加上标头Content-Type : application/x-www-form-urlencoded。并且会自动将请求转为 POST 方法,因此可以省略-X POST。
-d参数可以读取本地文本文件的数据,向服务器发送。
$ curl -d '@data.txt' https://google.com/login
上面命令读取data.txt文件的内容,作为数据体向服务器发送。
df # 查看硬盘使用情况 $ df -h # 查看各个文件夹大小 $ du -sh *
SSH 密钥免密登录 $ vim ~/.ssh/config Host test1 # 设置ssh host缩写 Hostname xxx.xxx.xxx.xxx # 服务器ip User xxx # 服务器用户名 Port 22 # 服务器端口 IdentityFile ~/.ssh/xxx_pk # 密钥ssh $ chmod 700 ~/.ssh/xxx_pk $ ssh test1
$ ssh-copy-id -i ~/.ssh/id_rsa.pub root@192.168.235.22
Host test1 #  设置ssh host缩写
Hostname xxx.xxx.xxx.xxx #  服务器ip
User xxx #  服务器用户名
Port 22 #  服务器端口
$ ssh test1
Supervisor # ubuntu $ apt-get install supervisor $ sudo chmod 777 /var/run $ sudo chmod 777 /etc/supervisor # centos # 安装supervisor $ yum install -y supervisor # 开机启动 $ systemctl enable supervisord # 启动supervisord $ systemctl start supervisord # 查看状态 $ systemctl status supervisord
[program:sync_goods_to_es]
process_name=%(program_name)s_%(process_num)02d
command=php artisan command.sync.goods.to.es  ;被监控的进程路径
priority=999 ;优先级,数值越低越先启动而越后关闭 (default 999)
autostart=true ;随着supervisord的启动而启动
autorestart=true ;自动重启
user=root ;用哪个用户启动进程,默认是root
numprocs=1 ;启动几个进程
redirect_stderr=true ;重定向stderr到stdout
stdout_logfile=/data0/log-data/service.log;
# 启动 $ ??? sudo unlink /var/run/supervisor.sock $ supervisord -c /etc/supervisord.conf # 部分命令 $ supervisorctl reload $ supervisorctl status $ supervisorctl start <进程名> $ supervisorctl stop <进程名> $ supervisorctl restart <进程名> $ supervisorctl update $ supervisorctl shutdown $ supervisorctl clear <进程名> $ supervisorctl # start stop restart + all 表示启动,关闭,重启所有进程。 # 关闭命令 $ supervisorctl stop all $ ps aux | grep supervisord $ kill -9 <pid>
配置环境变量 $ vim supervisor.conf [supervisord] logfile=/var/log/supervisor/supervisord.log ; (main log file;default $CWD/supervisord.log) pidfile=/var/run/supervisord.pid ; (supervisord pidfile;default supervisord.pid) childlogdir=/var/log/supervisor ; ('AUTO' child log dir, default $TEMP) environment = GOLANG_PROTOBUF_REGISTRATION_CONFLICT="warn" $ supervisorctl reload
Swagger $ go get -u github.com/swaggo/swag/cmd/swag $ go get -u github.com/swaggo/gin-swagger $ go get -u github.com/swaggo/files $ swag init -g server/http/http.go
import ( "github.com/gin-gonic/gin" swaggerFiles "github.com/swaggo/files" ginSwagger "github.com/swaggo/gin-swagger" _ "github.com/xxx/docs" ) eng := gin.Default() eng.GET("/swagger/*any" , ginSwagger.WrapHandler(swaggerFiles.Handler))
type GetOperationLogListResponse struct { List *[]model.OperationLog `json:"list"` Total int `json:"total"` } func GetOperationLogList (c *gin.Context) }
ReleaseTemplateAdd struct { Name string `json:"name"` DeployEnv string `json:"deploy_env"` GitlabType int `json:"gitlab_type"` GitlabBranchName string `json:"gitlab_branch_name"` IsAutoRelease int `json:"is_auto_release"` Description string `json:"description"` GitlabCITemplateID int32 `json:"gitlab_ci_template_id"` GitlabID uint32 `json:"gitlab_id"` } func ReleaseTemplateAdd (c *gin.Context) }
Ubuntu ZSH $ sudo apt-get update $ sudo apt upgrade $ sudo apt install curl wget git $ sudo apt install zsh # powerlevel10k GitHub - romkatv/powerlevel10k: A Zsh theme
Docker # docker Install Docker Engine on Ubuntu | Docker Documentation 要创建 docker 组并添加用户: (1).创建 docker 组 sudo groupadd docker (2).将自己的用户添加到 docker 组中: sudo usermod -aG docker 用户名 (3).注销并重新登陆以重新验证组成员关系。 如果在虚拟机上进行测试,则可能需要重新启动虚拟机才能使更改生效。 sudo service docker restart (4).验证不需要 sudo 运行 docker 命令: docker run hello-world 2.配置 Docker 在启动时启动 sudo systemctl enable docker # docker-compose 4.安装 docker-compose (1).运行以下命令下载最新版本的 docker-compose: sudo curl -L https://github.com/docker/compose/releases/download/1.18.0/docker-compose-`uname -s`-`uname -m` -o /usr/local/bin/docker-compose (2).更改二进制文件的权限,使其能够运行: sudo chmod +x /usr/local/bin/docker-compose (3).测试安装: docker-compose --version
安装 Go # 下载 go 语言包 $ sudo tar -C /usr/local -xzf go1.8beta1.linux-amd64.tar.gz $ cd /home/xxx/ $ sudo mkdir go $ chmod 777 go $ mkdir {src,pkg,bin} $ sudo chmod 777 {src,pkg,bin} $ cd ~ $ vim .bashrc # export PATH=$PATH :/usr/local /go/bin # export GOPATH=/home/xxx/go $ source .bashrc $ go env $ go version
安装 git 增加文件句柄 $ ulimit -n 12480 # 如果想持久化该属性, 可以把这句话加入 /etc/profile
VIM
比如要删除8-17行,在VIM模式下,输入:8,17d,即可将8-17行全部删除。
在VIM命令模式下,输入u。(与u相反的操作 Ctrl-r)
VMWARE win10 vmware与Hyper-V不兼容 打开控制面板,找到程序与功能,然后点击傍边的-启用或关闭Windows功能,找到里面的Hyper-V选项,取消勾选。
Windows PowerShell(管理员)
“win+ R“打开运行,输入gpedit.msc
重新启动。
搜狗输入法
#$year_$month_$day_$fullhour_$minute_$second
2021_07_13_15_58_43